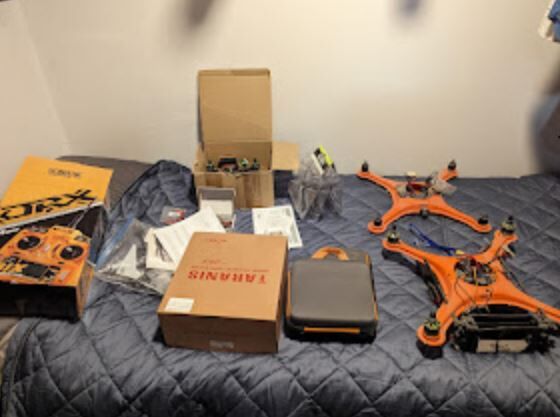


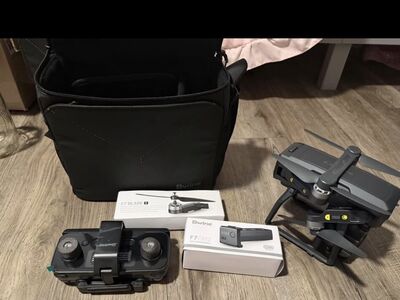
3 drones, 2 controllers, Tons of drone stuff, batteries, screws, for the DIY, Pixhawk, etc
15 Days
71
2
$200.00

Darrell
Description
Condition
Payment Types Accepted
 GooglePay
 PayPal
 Venmo
VenmoThere is a good 1-2 thousand dollars worth of stuff here. all not pictured. $0.10 on the dollar, $200 takes. I put it in a big box. (no Sony Camera included, only the FPV one)
You HAVE to be already into hobby drone stuff. Wankers asking "where is the charger?" or how to fly will be ignored. Prove to me that you know what you are getting. I'm not trying to be a jerk, I don't want someone to buy all of this stuff, then realize they don't know how to do *ANYTHING* and throw it away.
See pics better pics here:
https://photos.app.goo.gl/wESU24rPEA2Qiqvc6
This is a write up about one of the drones:
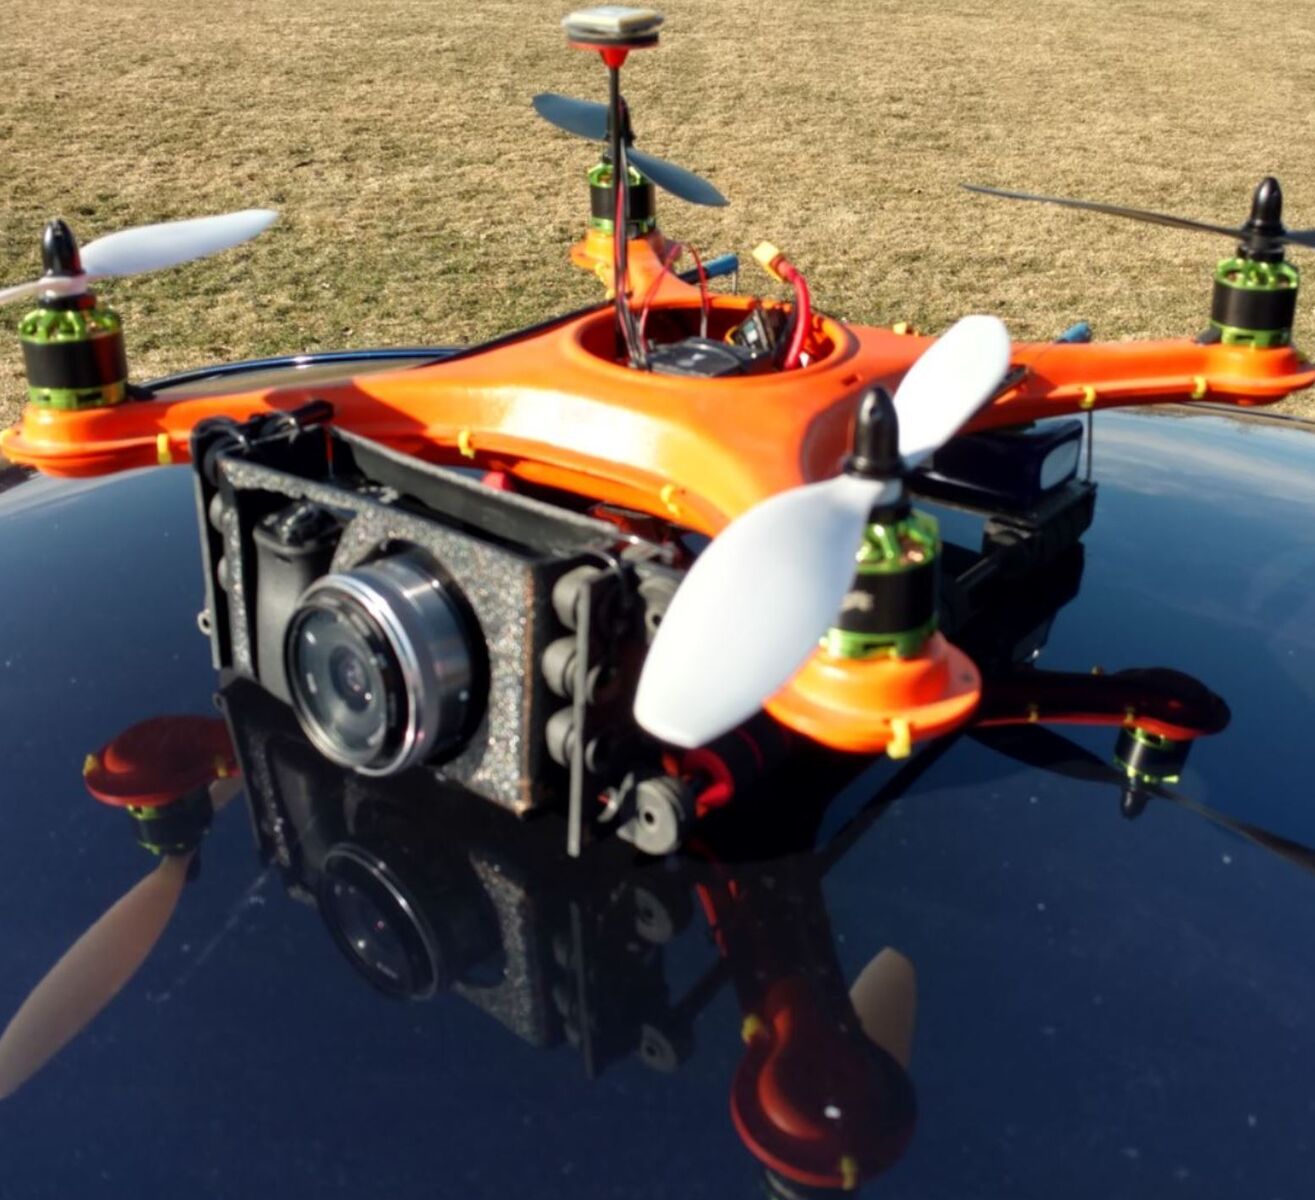
I have engineered up the smallest drone in the world that can carry real full size (ASP-C picture) Camera with remote video and camera functionality, somewhat “stabilized” (no gimbal, fixed mount.) This is most certainly a photography drone, not a videoography drone.
Specs:
Hiro Frame 450mm
PixFalcon Flight Controller
400 gram Damping balls
30 AMP RSC
Ublox Neo M8N GPS
Taranis X8R Receiver
Battery
This is based off the GameofDrones Hiro frame, which I love. Going the hobby route in drones (not recommended) I crashed a lot. But when I flew the Hiro, it was a dream, it handled so well, it was durable, and even though I hated the color, I fell in love with it. So I snagged another frame and started to play. I'm going to leave out most of the mistakes I made, so it makes me look smarter:
Started off by bought TWO of these:
Multifunction Care-Free High Crab FPV Landing Gear Set (Black)
Mark where to drill on the Hiro Frame, the angles are important. If you start by drilling straight (90 degrees) remember to drill this direction (pic), not this direction (pic)
Slide them in place. You will notice this adds a good deal of structural rigidity. Cool.
To make the Camera Cage I bought ABS PLASTIC SHEET 1/8" 12"
(3MM Thick) on ebay and laid it out, calculating how additional length for the bends. Then drilled enough holes for the damping balls. Cut it out, and used the heat gun and gloves and a corner of bench to make the angles.
I put my camera in it to see where the bottom Tripod mount hole needed to go.
I added some felt backed tape so the camera’s LCD won’t rub against the ABS plastic. It doesn't move around much once in the cage and mounted. But I wanted to do it.
So yes, I’ve had many many crashed during my iteration (Yes my camera has an accident protection warranty on it.) and the camera or lens has never been damaged at all. Even when it was thrown from the drone.
To put in the camera, I just take off the lens, the ABS plastic is very rigid but bends easily enough to drop in the camera, I put on the lens, screw in the tripod mount screw, and I’m ready. I’ve crashed the drone a good half dozen times, even throwing the camera separate from the drone and the camera has been 100% fine every single time. (Admittedly grass crashes)
I used some very stiff wire (I think I actually use some extra “Metal Push Rods M2.2xL300 to make the “C” brackets to connect the top and bottom Tubes in the rear. It is held together with filling the ends with high temp hot glue. This allows the frame flux a bit but they are very hard to pull out. They are in the tubes about 50mm (2 inches)
I just slide on the “Shock Absorbing Foam Skid Collars Red/Black” on the
I did NOT use the Micro HKPilot Mega PDB, BEC and Volt/AMP Sensor 30.5mm Mounting Because it’s only 60A capable, and with 4 X 30amp ESC’s, I need 120amp, so I had to go with the larger “HK Pilot Power VI Module, Distribution Board And Dual UBEC ALL-In-One”
Since I did not use the “normal” PDB, the included cable would not work, so I had to buy a “JST SH Jumper 6 Wire". I found it on ebay for a few bucks. Cut it in half and you have 2. Yes, this required splicing, this is the only soldering I had to do.
This goes on the very bottom of the tower. Above it I have a copper sheet too to reduce any interference.
The battery tray is also made by ABS plastic It’s attached to the tubes with some of the dampeners I stole from this:
Like I said, In the tests I had the camera thrown from the drone upon crash landings, put zip ties a bit loosely (so they do not compress the dampeners at all) on EACH DAMPENER!
The tower goes like this, top to bottom:
PixFalcon
Double Sided Sticky back Foam
Anti-vibration Shock Absorber Damping Plate for Mini APM (below the top plate is a copper sheet)
HK Pilot Power VI Module
Double Sided Sticky back Foam
Super Glue (I’ve had the sticky backed foam lift up which caused this (video) crash) and it’s done this before in my other Hiro drone too. Don’t trust the sticky back foam.
Hiro Orange Frame Bottom
GPS is off to the side.
I did lots of iteration, I will not bother telling you about what didn’t work. This is what did, and I’m 100% sure any one of you could figure out ways to do it even better.
Fully Loaded, with Sony A600 Camera+16mm f2.8 lens = 2102 grams.
Pickup in Riverton or Farmington.
You Might Also Like


3 drones, 2 controllers, Tons of drone stuff, batteries, screws, for the DIY, Pixhawk, etc
15 Days
71
2
$200.00
Darrell
Description
Condition
Payment Types Accepted
GooglePayPayPalVenmoThere is a good 1-2 thousand dollars worth of stuff here. all not pictured. $0.10 on the dollar, $200 takes. I put it in a big box. (no Sony Camera included, only the FPV one)
You HAVE to be already into hobby drone stuff. Wankers asking "where is the charger?" or how to fly will be ignored. Prove to me that you know what you are getting. I'm not trying to be a jerk, I don't want someone to buy all of this stuff, then realize they don't know how to do *ANYTHING* and throw it away.
See pics better pics here:
https://photos.app.goo.gl/wESU24rPEA2Qiqvc6
This is a write up about one of the drones:
I have engineered up the smallest drone in the world that can carry real full size (ASP-C picture) Camera with remote video and camera functionality, somewhat “stabilized” (no gimbal, fixed mount.) This is most certainly a photography drone, not a videoography drone.
Specs:
Hiro Frame 450mm
PixFalcon Flight Controller
400 gram Damping balls
30 AMP RSC
Ublox Neo M8N GPS
Taranis X8R Receiver
Battery
This is based off the GameofDrones Hiro frame, which I love. Going the hobby route in drones (not recommended) I crashed a lot. But when I flew the Hiro, it was a dream, it handled so well, it was durable, and even though I hated the color, I fell in love with it. So I snagged another frame and started to play. I'm going to leave out most of the mistakes I made, so it makes me look smarter:
Started off by bought TWO of these:
Multifunction Care-Free High Crab FPV Landing Gear Set (Black)
Mark where to drill on the Hiro Frame, the angles are important. If you start by drilling straight (90 degrees) remember to drill this direction (pic), not this direction (pic)
Slide them in place. You will notice this adds a good deal of structural rigidity. Cool.
To make the Camera Cage I bought ABS PLASTIC SHEET 1/8" 12"
(3MM Thick) on ebay and laid it out, calculating how additional length for the bends. Then drilled enough holes for the damping balls. Cut it out, and used the heat gun and gloves and a corner of bench to make the angles.
I put my camera in it to see where the bottom Tripod mount hole needed to go.
I added some felt backed tape so the camera’s LCD won’t rub against the ABS plastic. It doesn't move around much once in the cage and mounted. But I wanted to do it.
So yes, I’ve had many many crashed during my iteration (Yes my camera has an accident protection warranty on it.) and the camera or lens has never been damaged at all. Even when it was thrown from the drone.
To put in the camera, I just take off the lens, the ABS plastic is very rigid but bends easily enough to drop in the camera, I put on the lens, screw in the tripod mount screw, and I’m ready. I’ve crashed the drone a good half dozen times, even throwing the camera separate from the drone and the camera has been 100% fine every single time. (Admittedly grass crashes)
I used some very stiff wire (I think I actually use some extra “Metal Push Rods M2.2xL300 to make the “C” brackets to connect the top and bottom Tubes in the rear. It is held together with filling the ends with high temp hot glue. This allows the frame flux a bit but they are very hard to pull out. They are in the tubes about 50mm (2 inches)
I just slide on the “Shock Absorbing Foam Skid Collars Red/Black” on the
I did NOT use the Micro HKPilot Mega PDB, BEC and Volt/AMP Sensor 30.5mm Mounting Because it’s only 60A capable, and with 4 X 30amp ESC’s, I need 120amp, so I had to go with the larger “HK Pilot Power VI Module, Distribution Board And Dual UBEC ALL-In-One”
Since I did not use the “normal” PDB, the included cable would not work, so I had to buy a “JST SH Jumper 6 Wire". I found it on ebay for a few bucks. Cut it in half and you have 2. Yes, this required splicing, this is the only soldering I had to do.
This goes on the very bottom of the tower. Above it I have a copper sheet too to reduce any interference.
The battery tray is also made by ABS plastic It’s attached to the tubes with some of the dampeners I stole from this:
Like I said, In the tests I had the camera thrown from the drone upon crash landings, put zip ties a bit loosely (so they do not compress the dampeners at all) on EACH DAMPENER!
The tower goes like this, top to bottom:
PixFalcon
Double Sided Sticky back Foam
Anti-vibration Shock Absorber Damping Plate for Mini APM (below the top plate is a copper sheet)
HK Pilot Power VI Module
Double Sided Sticky back Foam
Super Glue (I’ve had the sticky backed foam lift up which caused this (video) crash) and it’s done this before in my other Hiro drone too. Don’t trust the sticky back foam.
Hiro Orange Frame Bottom
GPS is off to the side.
I did lots of iteration, I will not bother telling you about what didn’t work. This is what did, and I’m 100% sure any one of you could figure out ways to do it even better.
Fully Loaded, with Sony A600 Camera+16mm f2.8 lens = 2102 grams.
Pickup in Riverton or Farmington.
You Might Also Like
